Estes Saturn V Model Rocket with Box
Estes Saturn V Model Rocket
Estes Saturn V Model Rocket Kit

Saturn V

SKU: 001967
MSRP/MAP: $109.99
$109.99
Master

Reintroducing the Estes Saturn V model rocket builder's kit. Crafted for master difficulty, this kit meticulously replicates the iconic Saturn V rocket in a stunning 1:100 scale, offering a challenging yet rewarding build experience!

Designed to soar to new heights, the Saturn V utilizes 29MM engines, ensuring powerful propulsion and thrilling launches. With recommended engines, it can achieve a max altitude of up to 350 feet, providing an exhilarating spectacle for both builders and spectators!

Safety is paramount, and the Saturn V is equipped with a reliable parachute recovery system. Upon reaching its peak altitude, the rocket gracefully descends back to Earth, ready for another awe-inspiring launch.

The Saturn V model rocket builder's kit ensures an unforgettable journey through the cosmos! With meticulous attention to detail and a dedication to authenticity, Estes invites you to embark on a mission to the stars with the Saturn V!

  • SKILL LEVEL: Master
  • RECOMMENDED ENGINES: E16-4, F15-4
  • PROJECTED ALTITUDE: 350 ft. (106.7 m)

Overview

Unveiling the Estes Saturn V

Reintroducing the Estes Saturn V model rocket builder's kit. Crafted for master difficulty, this kit meticulously replicates the iconic Saturn V rocket in a stunning 1:100 scale, offering a challenging yet rewarding build experience!

Thrilling Launches

Designed to soar to new heights, the Saturn V utilizes 29MM engines, ensuring powerful propulsion and thrilling launches. With recommended engines, it can achieve a max altitude of up to 350 feet, providing an exhilarating spectacle for both builders and spectators!

Safety First

Safety is paramount, and the Saturn V is equipped with a reliable parachute recovery system. Upon reaching its peak altitude, the rocket gracefully descends back to Earth, ready for another awe-inspiring launch!

Embark on a Cosmic Journey

The Saturn V model rocket builder's kit ensures an unforgettable journey through the cosmos! With meticulous attention to detail and a dedication to authenticity, Estes invites you to embark on a mission to the stars with the Saturn V!

Take Flight

Whether you're a seasoned rocketry enthusiast or a beginner looking for an exciting challenge, the Saturn V model rocket builder's kit promises an unforgettable adventure. Experience the thrill of space exploration firsthand as you launch your very own Saturn V into the sky!

Estes Saturn V Model Rocket

What You Need to Fly
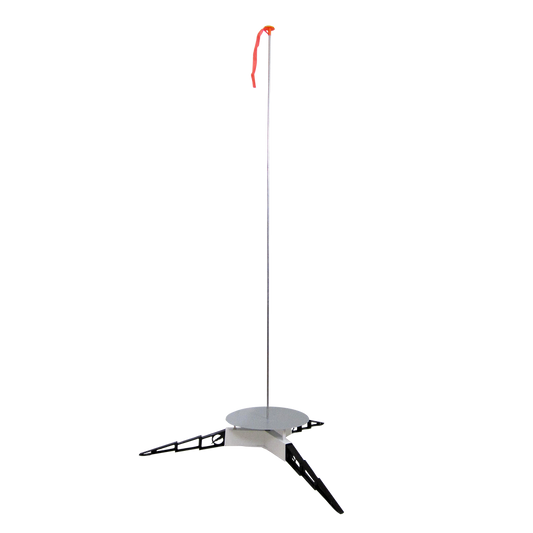
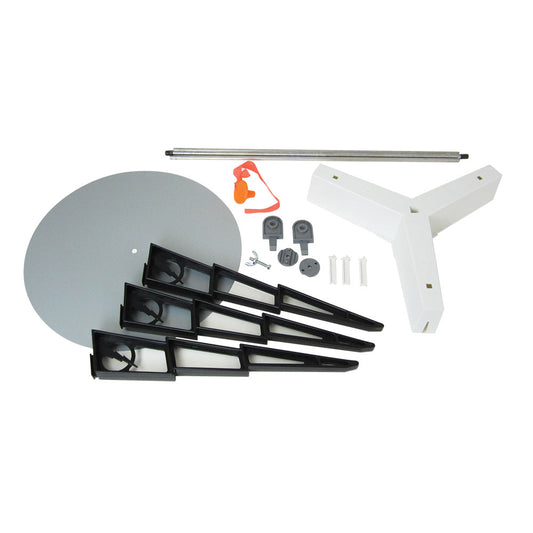
Porta-Pad E Launch Pad and E Launch Controller
Estes model rocket engines, starters and recovery wadding
Six C 1.5V high quality AA alkaline batteries (sold separately)

Technical Specifications

  • Recommended Engines

E16-4, F15-4
  • Launch System

Porta-Pad E
  • Projected Max Altitude

350 ft. (106.7 m)
  • Recovery System

24 in. (60.96 cm) Parachute
  • Length

43.25 in. (109.86 cm)
  • Diameter

3.94 in. (100.08 mm)
  • Weight

15.3 oz. (28.35 g)
  • Fin Material

Molded Plastic
Estes Saturn V Model Rocket with Box

Needed to Build (sold separately)

Pencil, #220 #320 #400 and #600 sandpaper, tweezers, hobby knife with several sharp blades, yellow glue, tube-type plastic cement, liquid plastic cement, permanent spray adhesive (not artists' or repositionable), CA, CA for plastics, CA accelerator, CA accelerator for plastics, sanding sealer, squadron green or white putty, masking tape, small paint brush, flat black enamel bottle paint, flat black enamel spray paint, flat white enamel bottle paint, flat white enamel spray paint, enamel silver spray paint, 1/4" launch rod, needle nose pliers
This product recommended for adults ages 18+ with adult supervision for those under 18, and rocketeers of all ages.

Customer Reviews

Based on 29 reviews
76%
(22)
7%
(2)
14%
(4)
0%
(0)
3%
(1)
M
M.G. (Kerrville, TX)
A few glitches but a fabulous kit!

This supersedes my previous review. My kit had a few glitches but it’s still a great model.
The motor mount rings were quite undersized but I got the mount well secured with Rocket Poxy. The escape tower alignment pins were not correctly molded but I was able to fix that and get the tower perfectly built. The lower wrap requires very careful trimming that is not precisely spelled out in the instructions. You will cut the excess off the top of the wrap very close to the corrugations, perhaps one millimeter. I did it wrong and left 1/4” above the corrugations. This caused the engine fairings to not fit properly. So this was half user error and half poor instructions. A way to get this perfect is to cut out and reinforce one of the fairings per the instructions. Then set the fairing in one of the v notches on the bottom wrap before trimming the wrap. Butt the edges of the fairing right up against the corrugations. Mark the aft end of the fairing on the wrap. That is your bottom trim line. Measure three inches forward of that for your forward trim line. This will get your bottom wrap trimmed perfectly! It’s a very emotionally evocative rocket if you lived through the Mercury, Gemini, and Apollo programs. It motivated me to load up on Apollo books and DVDs. Holding the finished model, I was transported back to July 20, 1969 like it was yesterday. Kind of choked me up actually.

R
Richard Clemens (Cleveland, OH)
Here I go again.

I finally have another one of my favorite rockets. The original took either a D engine or 3 C engines. I used D for a 100 foot altitude. Hopefully by spring....

M
Michael Guerra (Harper, TX)
A few defects, made in China.

The motor mount was extremely loose in the airframe, as another reviewer mentioned. I had to use a lot of epoxy to secure it. The escape tower halves must be glued together and they have alignment pins that engage with little holes. In my kit the pins lined up with pins! And holes with holes. The hole to hole side was no problem, but I had to cut off all the pins to get the two halves to join properly. And so did not get the benefit of the alignment. I did get them lined up manually, with the help of a set of MagEyes magnifiers. The main body tube coupler was a super tight fit, I had to sand it down substantially. I don’t believe this next problem was user error, but you can review my video. The engine fairings sat on top of the corrugations, not down flush in the v notch of the bottom wrap. I had to do some extremely tedious trimming of the corrugations to get the fairings to fit right. I trimmed and installed the wrap exactly per the instructions, but if y’all see an error, post a review to correct me. Still, I really like this kit, I watched the entire Mercury, Gemini and Apollo programs unfold as a kid. This really took me back to a time in America that is long gone. Holding the completed model filled me with pride and happy memories and actually choked me up. I’m loading up with books and videos of the Apollo program to re-live it all. But Estes needs to ramp up the QC. Video: https://youtu.be/RZckQud2YL8?si=IqQBlAj6_ljf57hD